Sync Improv

Improvising Integration


2 Comments

Installing JD Edwards EnterpriseOne Server Manager on WebLogic

We recently installed E1 Server Manager on WebLogic 12.1.3 and wanted to share our experience. With Tools Release 9.2, Server Manager cannot be installed on OC4J. It must be installed on WebLogic or WebSphere.

This post assumes that:

  • You are installing on Windows 2012 R2
  • You already have a functioning WebLogic install. If you plan on using the same server to host your E1 application, you probably created a WebLogic domain when you install it. Server Manager should not be installed in this domain. Follow these steps to create a domain and install Server Manger in this domain.

1. Launch the WebLogic configuration wizard. You can find this in Apps or just click start and type “Configuration Wizard” to locate the program.

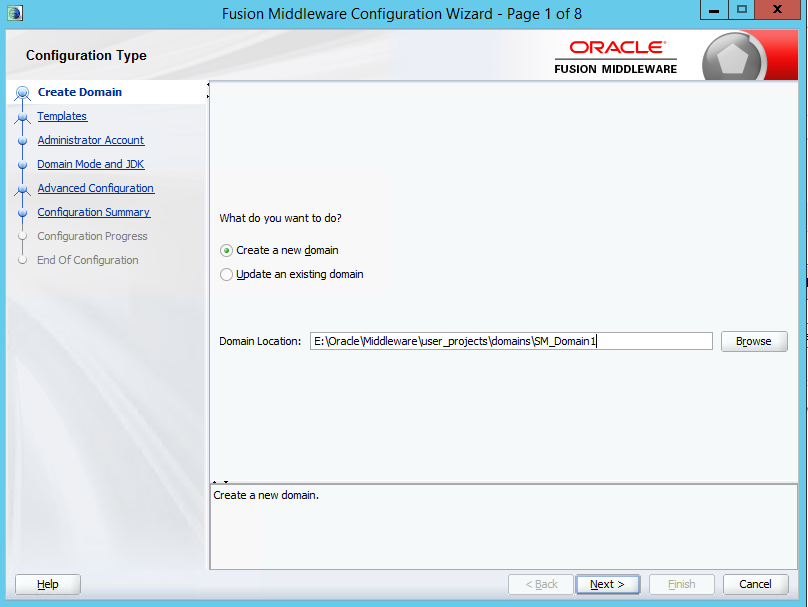
2. The wizard takes a few seconds to launch. Click “Create a new domain”. In the domain location, change the name “base_domain” to something more meaningful. Click Next.

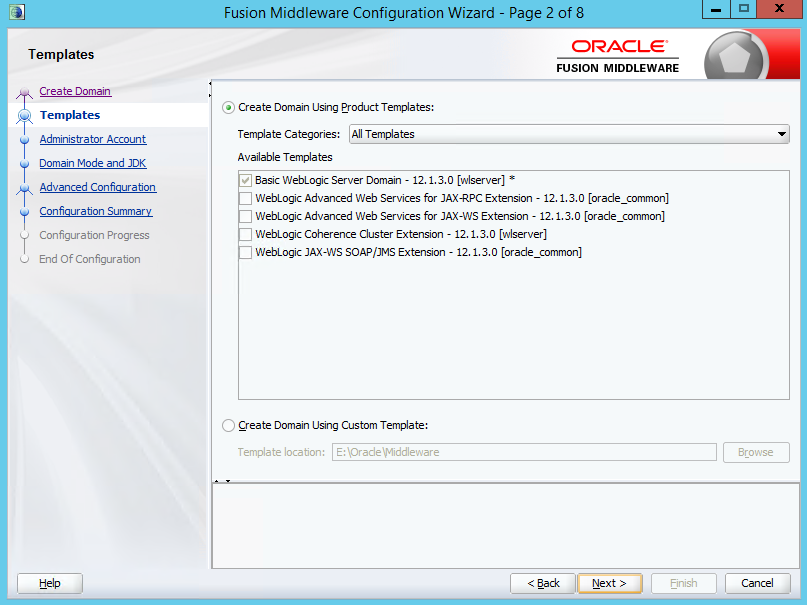
3. On the Templates page, leave the default settings and click Next.

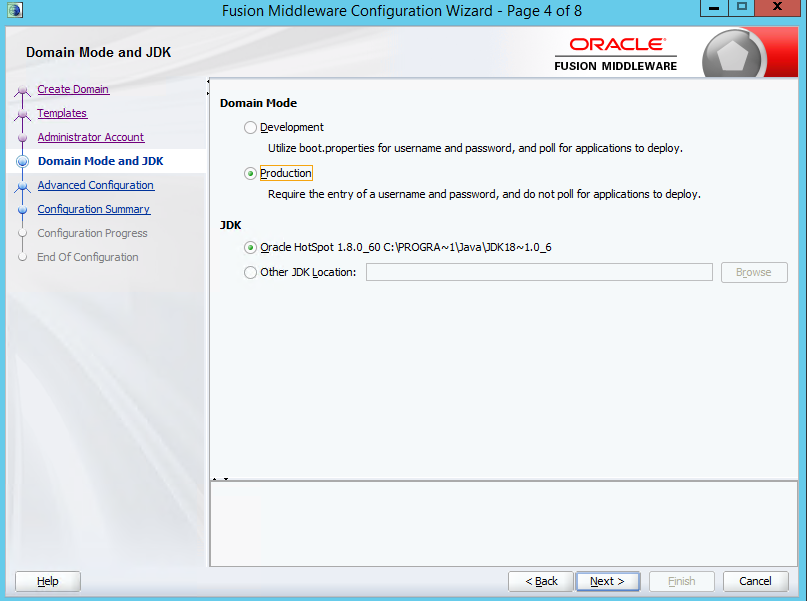
4. On the Domain Mode and JDK page, click Production and take the default JDK.

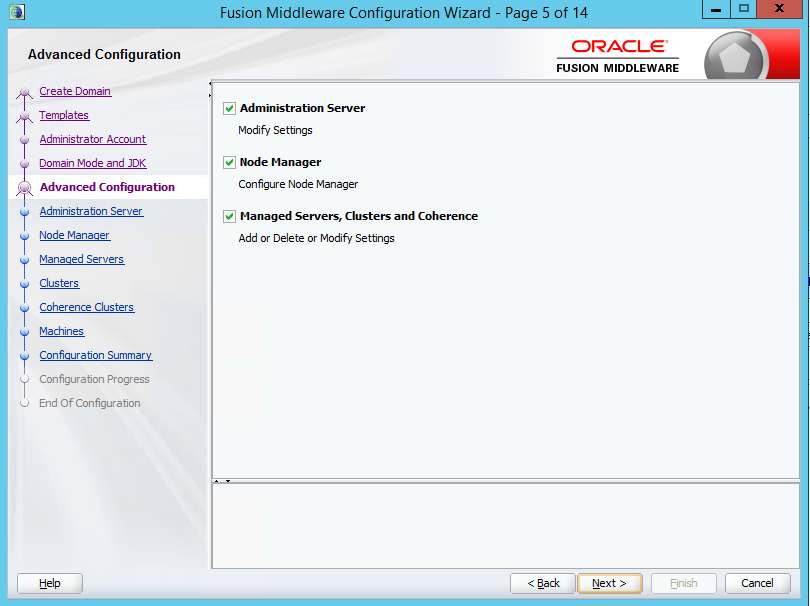
5. On Advanced Configuration page, check all options and click Next.

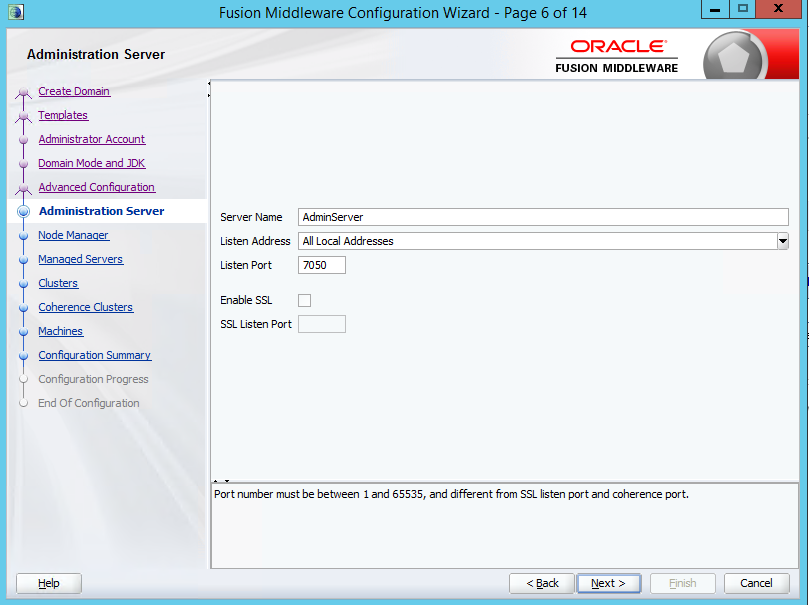
6. On Administration Server page, specify a unique port. This port should not be the same as any other domain port.

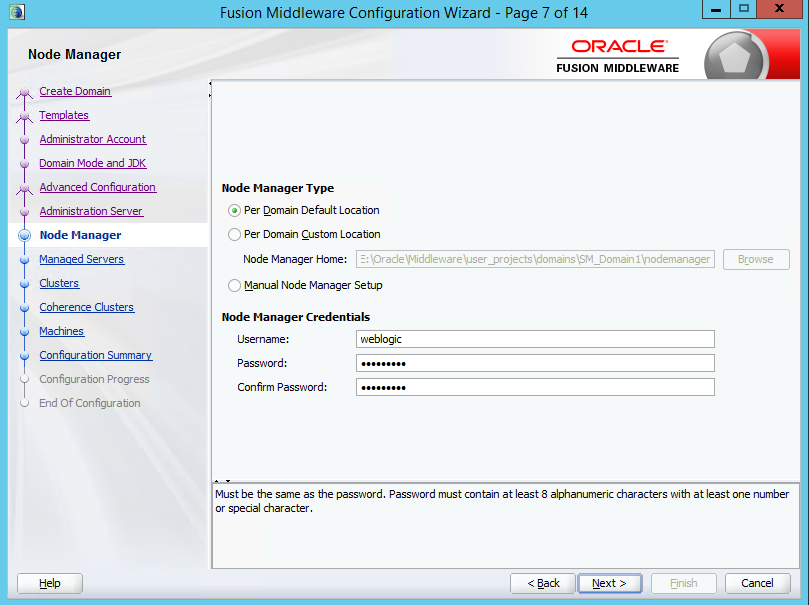
7. On Node Manager page, choose the default option, specify username/credentials and click Next.

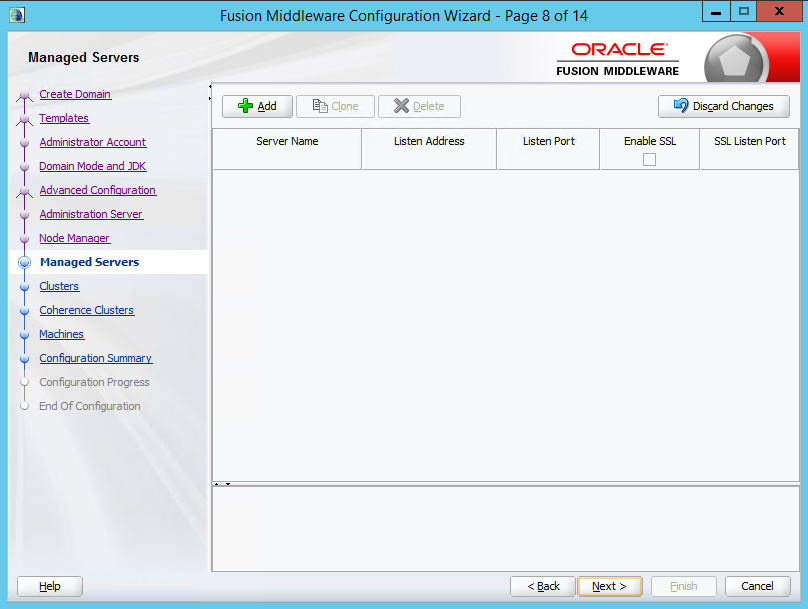
8. On the Managed Servers page, don’t add a server. The server will be added by the E1 SM install. Click Next.

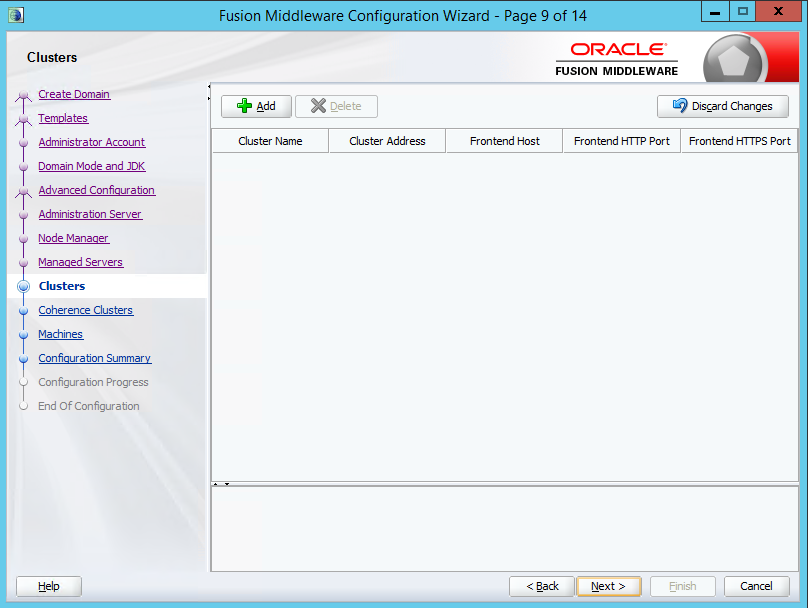
9. On the Clusters page, click Next (setting up a clustered configuration is beyond the scope of this post).

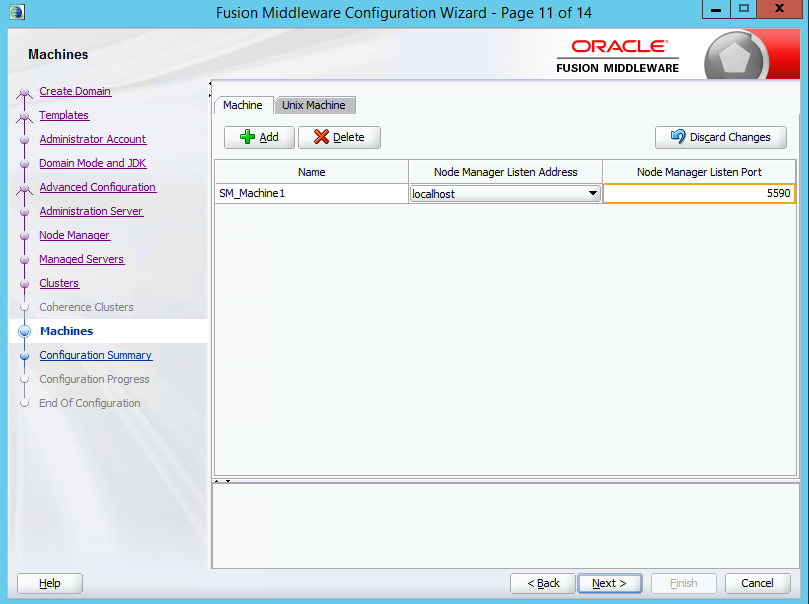
10. On the Machines page, you must add a machine. Set the Node manager listen address to localhost and specify a unique host. Again, this port must be unique to this server (i.e no conflicts with a domain or other node manager port).

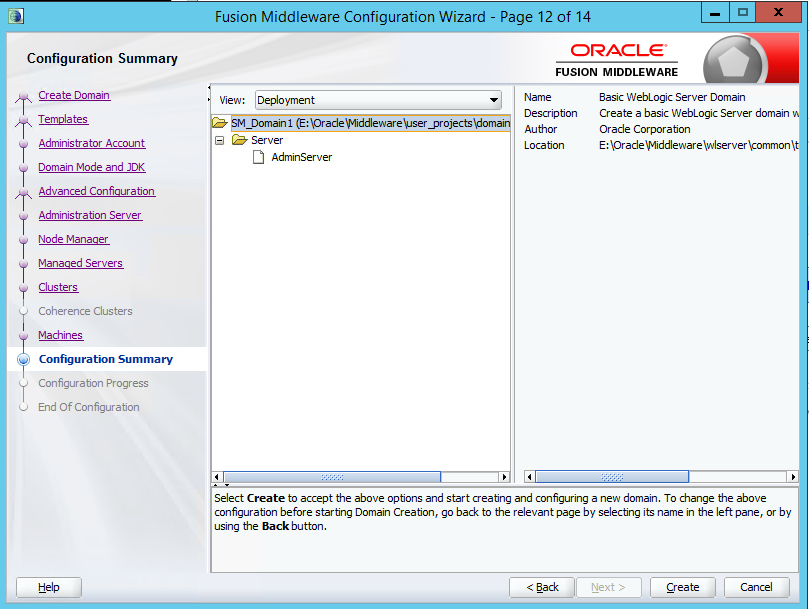
10. On the Configuration Summary page, click Create to create the domain.

11. In the End Of Configuration page, check the “Start Admin Server” box and click close. If you forget to do to this, you can start it by running the startManagedWebLogic file in the <wl_home>\user_projects\domains\<domain>\bin folder. On Windows, you should set up the Admin Server to start up as a service. (There are several resources on how to do this. If I get time, I will add a post on how to do this)

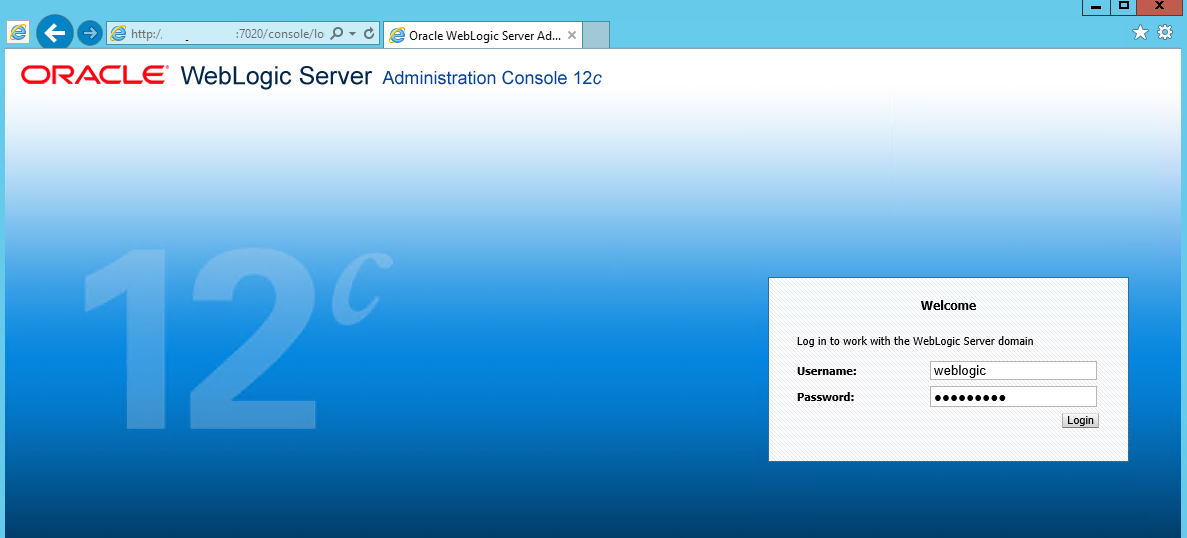
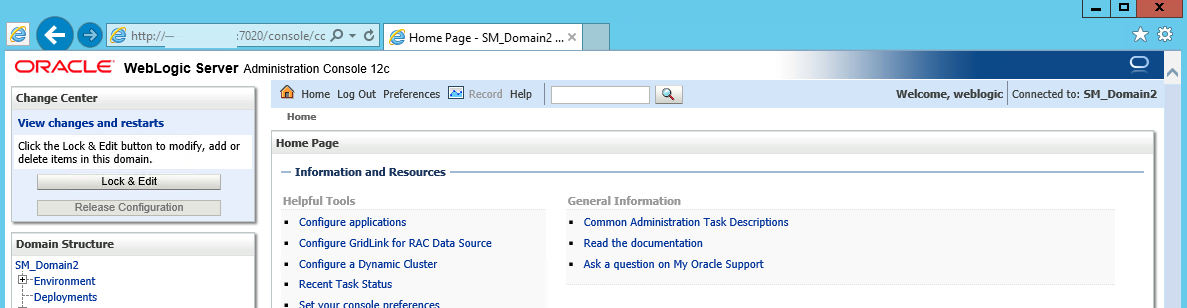
12. Launch the admin console and login to make sure that it is functional.

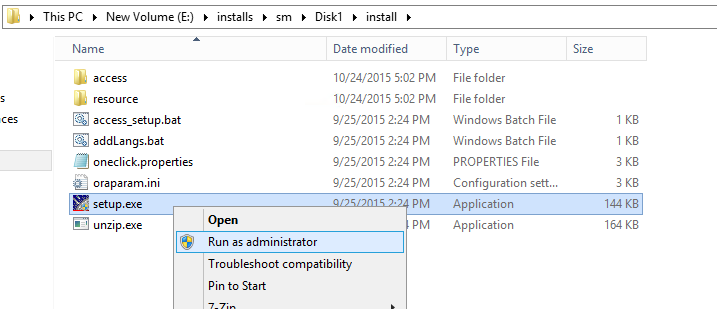
13. Extract the contents of the SM Console ZIP files to the same location. Run setup.exe (in Disk1\install) with elevated privileges.

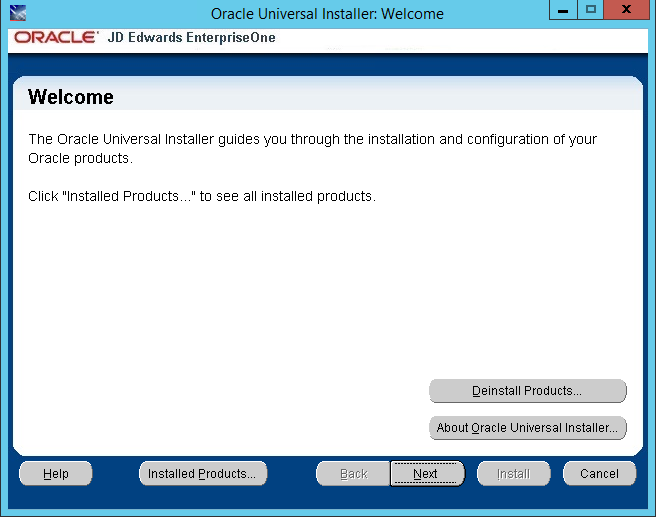
14. Click Next on the Welcome page.

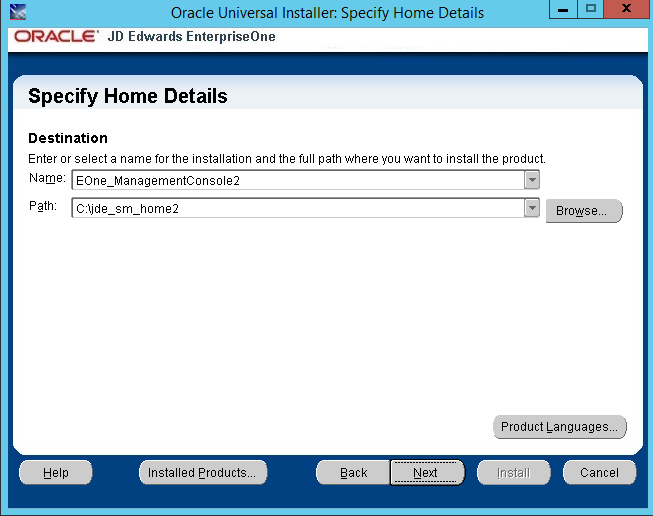
15. Enter a unique name for the Oracle Home and specify a unique path.

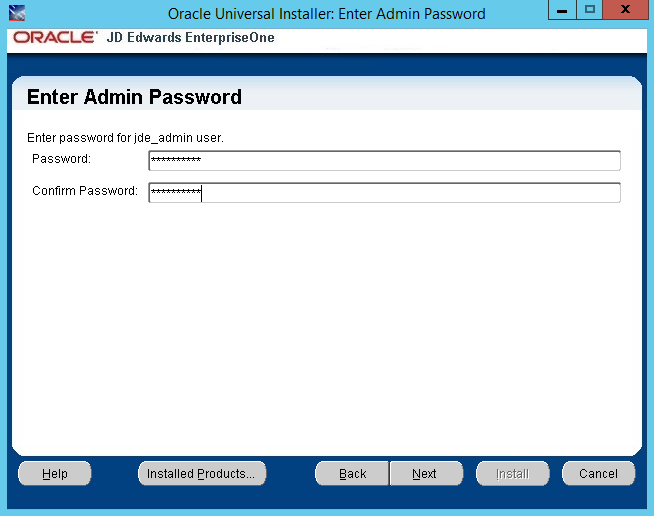
16. Specify the password for the jde_admin user. The password has unique requirements (refer to the official install guide for these).

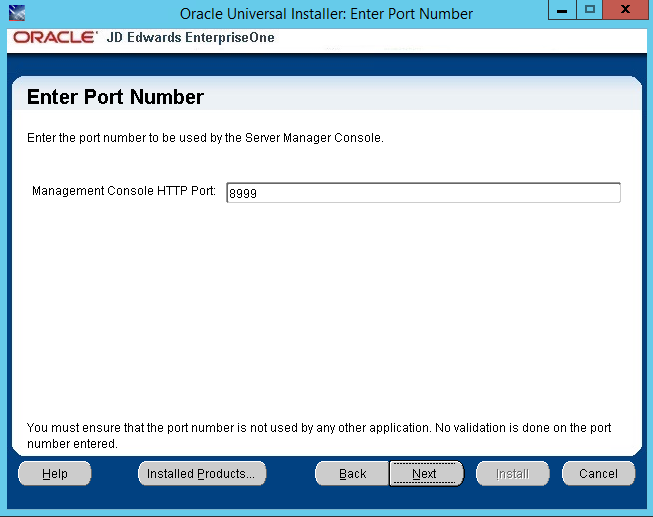
17. Specify the management port.

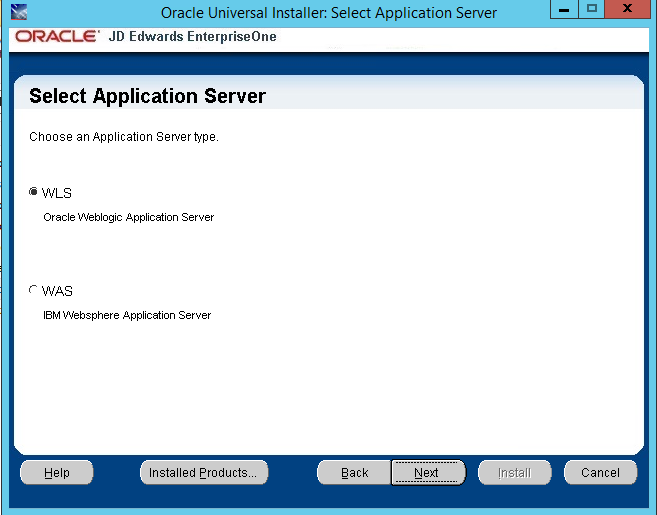
18. Specify WLS to indicate that you are installing this on WebLogic.

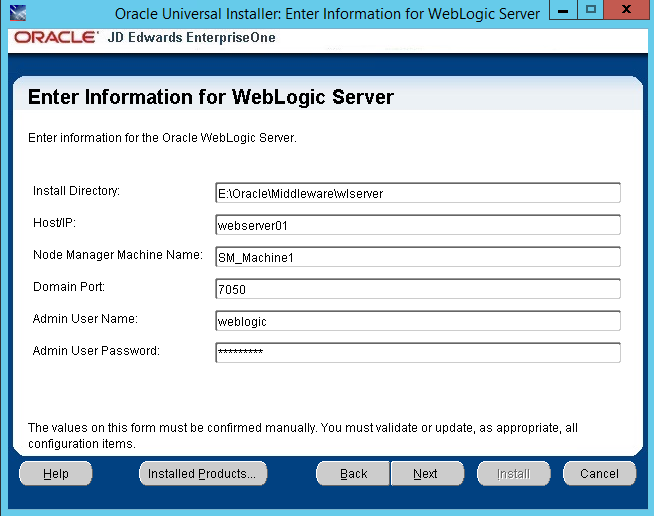
19. Filling out the WebLogic information page is the most crucial step in the install:

  • Install Directory: Make sure you include wlserver in the directory.
  • Host/IP: This is the name of your server.
  • Node Manager Machine Name: This is the name of the machine you created in the custom domain.
  • Domain Port: This the port of the domain (not the node manager port!).
  • Admin user/password: These are the admin credentials for WebLogic.

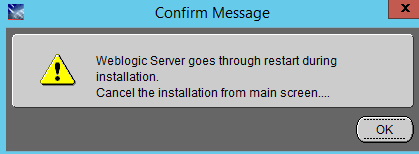
20. When you click Next, you will get a warning indicating that WebLogic will be restarted during the install.

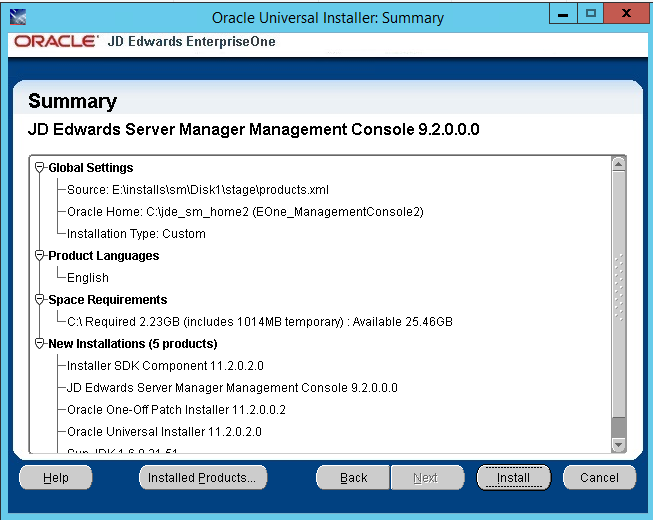
21. Click Install on the last page to begin the install. The install can take up to 15 minutes to complete. Be patient!


Things to watch out for:

  • If you get a message indicating that wlst.cmd  ended in error (process code -1), the most likely cause is incorrect information in the WebLogic information page (Step #19). Check the logs in the <console_home>\SCFHA\data folder to determine the cause of the error.
  • Before you restart a failed install, you should delete the server (if it is present, SMC_Server_EOne_ManagementConsole_Console) from the Admin console of the domain. You should also delete the entire <console_home> directory.


Leave a comment

Command Line Utility to code sign VSIX Packages.

I was looking for a utility to sign VSIX Packages (i.e. packages that extend Visual Studio). The link on this page (https://msdn.microsoft.com/en-us/library/dd997171.aspx) for a code sample leads to nowhere. I found this post (http://www.jeff.wilcox.name/2010/03/vsixcodesigning/) by Jeff Wilcox and decided to make a command line utility out of it (so it can be used in post-build events). Attached the VS 2013 solution for it.

To use the tool:


VSIXSign.exe packagefile pfxfile password

Just stick this in your post-build event and you are good to go!

Download: VSIXSign


Leave a comment

Calling a LynX Business Process (through the web service)

In this post, I’ll describe how to call a (LynX) business process through the web service.
Note: This post assumes that you are calling the web service from .Net. The web service can be called by any external app that can consume web services.

Web Service Methods

LynX Web Service provides a handful of methods/operations to submit and retrieve documents (if you are wondering why you can use the same web method for different E1 functions, read my previous posts). The web service is a SOAP based web service (we are working on a REST based implementation). Here is a partial screenshot of the operations provided by the service.

Web Service Methods

To call a business process, you need to call one of the Process Document methods. In its simplest form, the Process Document method requires three parameters:

  1. document: the string representation of the XML document. The document must be in Unicode (utf-16) format.
  2. password: the E1 password of the user specified in the e1user attribute of the document.
  3. attachmentSetID: the id of the attachment set (if attachments were submitted using the CreateAttachmentSet and AddAttachmentToSet methods)

Creating the input document

You can create the input document using any of the XML creation methods (XmlDocument, XmlWriter etc.). However, there is an easier way to do it: use the XML Schema to create a typed class and serialize the object to create the XML document. You can use xsd.exe to create the typed class. I prefer to use a tool called Xsd2Code to create typed classes as it is integrated with the Visual Studio IDE. You can download it here.

Side notes on Xsd2Code (see screenshots below):

  • Make sure that you set the target framework to your framework level and the GenerateXmlAttributes property to True
  • You can auto-generate the code by setting the Custom Tool property of the schema file to Xsd2CodeCustomTool

Xsd2Code1

Xsd2Code2

Here’s a function to create a typed object for the business process ERP.EOne.Training1 (download the solution at the end of this post).


    static string CreateDocument()
    {
      // create the document using the typed class
      BusinessDocument bd = new BusinessDocument();
      bd.processsettings = new ProcessSettings();
      // this tells lynX which business process to execute
      bd.processsettings.aelliusrequestid = "ERP.EOne.Training1";
      bd.processsettings.anonymous = false;
      bd.processsettings.debug = false;
      bd.processsettings.e1role = "*ALL";
      bd.processsettings.e1user = "E1USER";
      bd.processsettings.environment = "JDV910";
      bd.processsettings.keeprepository = true;
      bd.processsettings.lynxapp = "LynX App";
      bd.processsettings.lynxuser = "E1USER";

      bd.document = new Document();
      bd.document.input = new Input();
      bd.document.input.AddressName = "*Test*";

      // serialize the XML
      XmlSerializer xs = new XmlSerializer(bd.GetType());
      StringBuilder sb = new StringBuilder();
      XmlWriterSettings xws = new XmlWriterSettings() { Indent = true, Encoding = System.Text.Encoding.Unicode };
      using (XmlWriter xw = XmlWriter.Create(sb, xws))
      {
        xs.Serialize(xw, bd);
      }

      // this is XML document that needs to be submitted
      string document = sb.ToString();

      return document;
    }

This function creates an XML document that looks like this:

<?xml version="1.0" encoding="utf-16"?>
<aelliusconnector>
  <processsettings 
    aelliusrequestid="ERP.EOne.Training1" 
    environment="JDV910" 
    debug="false" 
    processmode="object" 
    anonymous="false" 
    e1user="E1USER" 
    e1role="*ALL" 
    lynxapp="LynX App" 
    lynxuser="E1USER" />
  <document>
    <input>
      <AddressName>*Test*</AddressName>
    </input>
    <output />
  </document>
</aelliusconnector>

Submitting the document

To call the web service, you can simply add a service reference or just reference LynXProxy, a class library that is part of the product.
Here is a function to submit the document to the web service:

    static void SubmitDocument(string document)
    {
      WebProxy wb = new WebProxy();

      // set the url for the web service
      wb.SetUrl("http://yourwebserice.com/lynxweservice/lynxwebservie.asmx");

      // set the credentials to access the web serivce
      // the web sevice supports windows integrated and 
      // basic authentication. these are not necessarily the
      // crendentails to access E1.
      // named parameters used for clarity
      wb.SetCredentials(userName: "userid", password: "password", domain: "domain");
      
      // login to E1 through the web service
      // this is optional
      wb.LoginUser(userID: "E1USER", 
        password: "e1password", 
        role: "*ALL", environment: "JDV910", 
        debug: false);

      // submit the document
      string output = wb.ProcessDocument(document: document, password: "e1password", attachmentsetID: 0);

      // load the XML document - you can also deserialize it
      // to a typed object
      XmlDocument xml = new XmlDocument();
      xml.PreserveWhitespace = true;
      xml.LoadXml(output);

      // check the status of the document
      bool success = ((XmlElement)xml.DocumentElement.SelectSingleNode("document")).GetAttribute("status") == "true";

      // get errors
      if (!success)
      {
        Console.WriteLine("Document submission failed. Errors below.");

        foreach (XmlElement error in xml.DocumentElement.SelectNodes("errors/error"))
        {
          Console.WriteLine(error.GetAttribute("description"));
        }
      }
      else
      {
        Console.WriteLine("Document submitted successfully!");
      }
    }

That’s it! As you can see, it is pretty straightforward to create the input and call the business process through the web service.
Here is the link to the Visual Studio (2010) solution.

LynXDemo


2 Comments

Creating a Business Process (in LynX Business Integrator)

In this post, I’ll describe how to create a business process (in .Net) that integrates with EnterpriseOne. The development process consists of the following steps:

Determine/Design the input for business process

The input for the business process plays an important role in creating the XML schema for the business process. As indicated in my previous post, the XML schema is used to validate the input document. The following factors come into play in determining the input:

  • Can the external app create XML documents (in Unicode)? If it cannot send data in XML, what format can it send the data in (text, binary)?
  • Can you dictate the format/structure of the input to the external app? (i.e. it is flexible enough to create a document in your format or do you have to conform to the external app’s format)
  • Any other restrictions? Such as: Cannot send dates in XML format (YYYY-MM-DD).

Create the Class Library

The class library is created in Visual Studio using the LynX Business Process template. This template creates a class library project with references to the Lynx.Net libraries.
Identify the EnterpriseOne objects
This depends on the area of integration. For example, if you want to create address book records in EnterpriseOne, you will need the Address Book and/or Customer, Supplier master business functions (N0100041, N0100042, N0100043).

Use dnetgen to create typed EnterpriseOne classes

In addition to creating typed classes, dnetgen creates the following:

XML Schema snippet

The schema snippet can be used to extend the XML schema for the business process. When you include an EnterpriseOne object in dnetgen, you intend to use it in your business process. For example, if you included F0005, you probably want to do a SELECT, INSERT or UPDATE on F0005. If you included the Address Book Master Business Function (MBF), you probably want to call it in your business process. The input for these operations may come from hard/soft coded values or from the input document. In other words, there is a pretty good chance that your input document’s format is determined by the EnterpriseOne objects in your project. And that format is determined by the EnterpriseOne’s data dictionary. Consider the following scenario:

  • You are creating a business process to create address book records in E1. To do that, you need to call the Address Book MBF.
  • The Address Book MBF has upwards of 80 input parameters, depending on your E1 version.
  • Your input source does not have all these 80 input values, but has the most common ones used to create an address book record – the name and address fields.
  • In E1, the name field is restricted to 40 characters and the address line fields are restricted to 30 characters, so your XML schema for the input document should probably reflect this restriction.

That’s where the schema snippet comes into play. The schema snippet created by dnetgen includes all the parameters of the Address Book MBF. You can now use this to customize the schema for your input document. Here is how the schema snippet looks like (shortened and modified for clarity):

<!--
		Complex Type for Business Function:
			Name: AddressBookMasterMBF
			Description: Address Book - MBF
			Module: N0100041
			Library: CALLBSFN  
-->
<xs:complexType name="AddressBookMasterMBF">
  <xs:sequence>
    <!--Parameter: mnAddressBookNumber Alias: AN8 -->
    <xs:element name="AddressNumber" maxOccurs="1" minOccurs="0">
      <xs:annotation>
        <xs:appinfo source="AN8" />
      </xs:annotation>
      <xs:simpleType>
        <xs:restriction base="xs:decimal">
          <xs:fractionDigits value="0" />
          <xs:totalDigits value="8" />
        </xs:restriction>
      </xs:simpleType>
    </xs:element>
    <!--Parameter: szLongAddressNumber Alias: ALKY -->
    <xs:element name="AlternateAddressKey" maxOccurs="1" minOccurs="0">
      <xs:annotation>
        <xs:appinfo source="ALKY" />
      </xs:annotation>
      <xs:simpleType>
        <xs:restriction base="xs:string">
          <xs:minLength value="0" />
          <xs:maxLength value="20" />
        </xs:restriction>
      </xs:simpleType>
    </xs:element>
    <!--Parameter: szTaxId Alias: TAX -->
    <xs:element name="TaxId" maxOccurs="1" minOccurs="0">
      <xs:annotation>
        <xs:appinfo source="TAX" />
      </xs:annotation>
      <xs:simpleType>
        <xs:restriction base="xs:string">
          <xs:minLength value="0" />
          <xs:maxLength value="20" />
        </xs:restriction>
      </xs:simpleType>
    </xs:element>
    <!--Parameter: szSearchType Alias: AT1 -->
    <xs:element name="AddressType" maxOccurs="1" minOccurs="0">
      <xs:annotation>
        <xs:appinfo source="AT1" />
      </xs:annotation>
      <xs:simpleType>
        <xs:restriction base="xs:string">
          <xs:minLength value="0" />
          <xs:maxLength value="3" />
        </xs:restriction>
      </xs:simpleType>
    </xs:element>
    <!--Parameter: szAlphaName Alias: ALPH -->
    <xs:element name="AlphaName" maxOccurs="1" minOccurs="0">
      <xs:annotation>
        <xs:appinfo source="ALPH" />
      </xs:annotation>
      <xs:simpleType>
        <xs:restriction base="xs:string">
          <xs:minLength value="0" />
          <xs:maxLength value="40" />
        </xs:restriction>
      </xs:simpleType>
    </xs:element>
    <!--Parameter: szMailingName Alias: MLNM -->
    <xs:element name="MailingName" maxOccurs="1" minOccurs="0">
      <xs:annotation>
        <xs:appinfo source="MLNM" />
      </xs:annotation>
      <xs:simpleType>
        <xs:restriction base="xs:string">
          <xs:minLength value="0" />
          <xs:maxLength value="40" />
        </xs:restriction>
      </xs:simpleType>
    </xs:element>
    <!--Parameter: szSecondaryMailingName Alias: MLN1 -->
    <xs:element name="SecondaryMailingName" maxOccurs="1" minOccurs="0">
      <xs:annotation>
        <xs:appinfo source="MLN1" />
      </xs:annotation>
      <xs:simpleType>
        <xs:restriction base="xs:string">
          <xs:minLength value="0" />
          <xs:maxLength value="40" />
        </xs:restriction>
      </xs:simpleType>
    </xs:element>
    <!--Parameter: szAddressLine1 Alias: ADD1 -->
    <xs:element name="AddressLine1" maxOccurs="1" minOccurs="0">
      <xs:annotation>
        <xs:appinfo source="ADD1" />
      </xs:annotation>
      <xs:simpleType>
        <xs:restriction base="xs:string">
          <xs:minLength value="0" />
          <xs:maxLength value="40" />
        </xs:restriction>
      </xs:simpleType>
    </xs:element>
    <!--Parameter: szAddressLine2 Alias: ADD2 -->
    <xs:element name="AddressLine2" maxOccurs="1" minOccurs="0">
      <xs:annotation>
        <xs:appinfo source="ADD2" />
      </xs:annotation>
      <xs:simpleType>
        <xs:restriction base="xs:string">
          <xs:minLength value="0" />
          <xs:maxLength value="40" />
        </xs:restriction>
      </xs:simpleType>
    </xs:element>
    <!--Parameter: szAddressLine3 Alias: ADD3 -->
    <xs:element name="AddressLine3" maxOccurs="1" minOccurs="0">
      <xs:annotation>
        <xs:appinfo source="ADD3" />
      </xs:annotation>
      <xs:simpleType>
        <xs:restriction base="xs:string">
          <xs:minLength value="0" />
          <xs:maxLength value="40" />
        </xs:restriction>
      </xs:simpleType>
    </xs:element>
    <!--Parameter: szAddressLine4 Alias: ADD4 -->
    <xs:element name="AddressLine4" maxOccurs="1" minOccurs="0">
      <xs:annotation>
        <xs:appinfo source="ADD4" />
      </xs:annotation>
      <xs:simpleType>
        <xs:restriction base="xs:string">
          <xs:minLength value="0" />
          <xs:maxLength value="40" />
        </xs:restriction>
      </xs:simpleType>
    </xs:element>
  </xs:sequence>
</xs:complexType>

XML Sample Document Fragment

dnetgen also creates sample document fragment that correspond to the input values for the EnterpriseOne object. For example, if you included a table object, the sample fragment has fields in the table. For business functions, the sample fragment has all input parameters. Here is a sample fragment for the Address Book MBF (shortened for clarity):

<AddressBookMasterMBF>
  <AddressNumber>0</AddressNumber>
  <AlternateAddressKey> </AlternateAddressKey>
  <TaxId> </TaxId>
  <AddressType1> </AddressType1>
  <AlphaName> </AlphaName>
  <MailingName> </MailingName>
  <SecondaryMailingName> </SecondaryMailingName>
  <AddressLine1> </AddressLine1>
  <AddressLine2> </AddressLine2>
  <AddressLine3> </AddressLine3>
  <AddressLine4> </AddressLine4>
  <ZipCodePostal> </ZipCodePostal>
  <City> </City>
</AddressBookMasterMBF>

You can use this to build your sample document: the fragment saves you a lot typing.

Sample C# code

It can take a while to write code that sets the input values of a business function that has many parameters (like the Address Book MBF) or code that sets insert values of a large table like F0911Z1. dnetgen creates sample code that you can cut-and-paste into your C# class/function. Here is the generated sample code for the Address Book MBF object (shortened for clarity):

   /*******************************************************************************/
      // Business function | Module: N0100041; Library: CALLBSFN; Description: Address Book - MBF
      // create the business function object
      AddressBookMasterMBF bsfn = new AddressBookMasterMBF();

      bsfn.DpmnAddressBookNumber.InValue = (long)entity_object.AddressNumber;
      bsfn.DpszLongAddressNumber.InValue = entity_object.AlternateAddressKey;
      bsfn.DpszTaxId.InValue = entity_object.TaxId;
      bsfn.DpszSearchType.InValue = entity_object.AddressType1;
      bsfn.DpszAlphaName.InValue = entity_object.NameAlpha;
      bsfn.DpszSecondaryAlphaName.InValue = entity_object.Kanjialpha;
      bsfn.DpszMailingName.InValue = entity_object.NameMailing;
      bsfn.DpszSecondaryMailingName.InValue = entity_object.SecondaryMailingName;
      bsfn.DpszDescriptionCompressed.InValue = entity_object.DescripCompressed;
      bsfn.DpszBusinessUnit.InValue = entity_object.CostCenter;
      bsfn.DpszAddressLine1.InValue = entity_object.AddressLine1;
      bsfn.DpszAddressLine2.InValue = entity_object.AddressLine2;
      bsfn.DpszAddressLine3.InValue = entity_object.AddressLine3;
      bsfn.DpszAddressLine4.InValue = entity_object.AddressLine4;
      bsfn.DpszPostalCode.InValue = entity_object.ZipCodePostal;
      //
      // code for remaining parameters ...
      //

      // execute the business function
      BusinessFunctionResult result = bsfn.Execute();

      if (result != BusinessFunctionResult.Error)
      {
        // get the output parameters
        // get the output parameters
        //bsfn.DpcActionCode.OutValue
        //bsfn.DpcUpdateMasterFile.OutValue
        //bsfn.DpcProcessEdits.OutValue
        //bsfn.DpcSuppressErrorMessages.OutValue
      }
      else
      {
        // set document's status to false (optional)
        DocumentContext.DocumentStatus = false;		      
      }
      
      // collect errors (optional)
      DocumentContext.AddError(bsfn, true);
      success = (result == BusinessFunctionResult.Success);

Create the logic for your process in the class library

As indicated in my previous post, the LynX.Net infrastructure calls the ProcessDocument method in the class that implements the IIntegrationProcess interface. You can have any number of classes that implement this interface (in the class library). So, how does LynX.Net know which class’s method to call for a given document? All input documents have an integration ID, which uniquely identifies a business process in LynX. It looks for the class that is decorated with the BusinessProcess attribute whose IntegrationID property is set to the one in the input document. For example, if the Integration ID of the input document is ERP.EOne.Demo, you must have a class that is coded this way:
[BusinessProcess(IntegrationID = “ERP.EOne.Demo”, Description = “This is a demo”)]
public class DemoClass : Aellius.Sandhi.LynX.IIntegrationProcess

In my previous post, I described the following coding steps, so I won’t repeat myself here.

  1. Retrieve the data from the XML document.
  2. Use LynX.Net API to access EnterpriseOne objects (detail below)
  3. Create the output document. This document will be returned to the caller through the web service.

The following steps are common to all EnterpriseOne objects:

  1. Include the object in dnetgen (and reference the generated library in your project)
  2. Extended the XML schema based on your requirements
  3. Extend the sample document for testing

Calling a Business Function

To call a business function:

  • Create an instance of the business function
  • Set the input parameters (use the generated sample as needed)
  • Call Execute
  • Retrieve errors.

Sample code:

   private bool CallAddressBookBsfn(BusinessDocument businessDocument, Transaction transaction)
    {
      AddressBookMaster abm = businessDocument.document.input.AddressBook;

      // create an instance of the Address Book Master Business function
      // note the use of JDE Transactions
      AddressBookMasterMBF bsfn = new AddressBookMasterMBF(transaction);

      // set parameters - most of this code is auto-generated
      bsfn.DpmnAddressBookNumber.InValue = (long)abm.AddressNumber;
      bsfn.DpszSearchType.InValue = abm.AddressType;
      bsfn.DpszAlphaName.InValue = abm.Name;
      bsfn.DpszAddressLine1.InValue = abm.AddressLine1;
      bsfn.DpszAddressLine2.InValue = abm.AddressLine2;
      bsfn.DpszAddressLine3.InValue = abm.AddressLine3;
      bsfn.DpszAddressLine4.InValue = abm.AddressLine4;
      bsfn.DpszPostalCode.InValue = abm.ZipCodePostal;
      bsfn.DpszCity.InValue = abm.City;
      bsfn.DpszState.InValue = abm.State;
      bsfn.DpszCountry.InValue = abm.Country;
      bsfn.DpcActionCode.InValue = 'A';
      bsfn.DpcUpdateMasterFile.InValue = '1';

      // execute the business function
      if (bsfn.Execute() != BusinessFunctionResult.Success)
      {
        DocumentContext.AddError(bsfn.GetExceptions(), true);
        return false;
      }

      // assign output
      businessDocument.document.output.AddressNumber = bsfn.DpmnAddressBookNumber.OutValue;
      businessDocument.document.output.AddressNumberSpecified = true;
      return true;
    }

Database Operations

You can do SELECT on table and view objects, and INSERT, UPDATE and DELETE database operations on table objects. Keep in mind that E1 row and business unit security are in effect during these operations.

SELECT operations:
  1. Create an instance of the table or view.
  2. Set the list of columns to be selected by setting the SelectColumn property of the table column. For views, all columns are selected, so this property does not exist.
  3. Call AddCriteria to specify your WHERE clause
  4. Call Select, then Fetch to fetch the data
  5. Close the table

Sample Code:

   private List<string> GetStates()
    {
      F0005 f0005 = new F0005();
      f0005.SelectAllColumns();
      f0005.AddCriteria(Parenthesis.None, Conjunction.And, F0005.Column.ProductCode, SingleValueOperator.EqualTo,
        "00");
      f0005.AddCriteria(Parenthesis.None, Conjunction.And, F0005.Column.UserDefinedCodes, SingleValueOperator.EqualTo,
        "ST");

      List<string> states = new List<string>();
      while (f0005.Fetch())
      {
        states.Add(f0005.TcUserDefinedCode.SelectedValue.Trim());
      }
      f0005.Close();

      return states;
    }
INSERT
  • Create an instance of the table.
  • Set the InsertValue of all table columns.
  • Close the table

Sample code:

private void AddUDCCode()
    {
      GetAuditInfo auditinfo = new GetAuditInfo();
      if (auditinfo.Execute() != BusinessFunctionResult.Success) return;

      F0005 f0005 = new F0005();
      // these values are hard coded here, but typically
      // they will come from the input document and/or a configuration file
      // except for the values, this code was cut/paste from the sample file
      // that dnetgen generated
      f0005.TcProductCode.InsertValue = "59";
      f0005.TcUserDefinedCodes.InsertValue = "CC";
      f0005.TcUserDefinedCode.InsertValue = "01";
      f0005.TcDescription001.InsertValue = "Test";
      f0005.TcDescription01002.InsertValue = "Code";
      f0005.TcSpecialHandlingCode.InsertValue = " ";
      f0005.TcUdcOwnershipflag.InsertValue = ' ';
      f0005.TcHardCodedYN.InsertValue = 'N';
      f0005.TcUserId.InsertValue = auditinfo.DpszUserName.OutValue;
      f0005.TcProgramId.InsertValue = "LYNX";
      f0005.TcDateUpdated.InsertValue = auditinfo.DpjdDate.OutValue;
      f0005.TcWorkStationId.InsertValue = auditinfo.DpszWorkstation_UserId.OutValue;
      f0005.TcTimeLastUpdated.InsertValue = auditinfo.DpmnTime.OutValue;

      f0005.Insert();

      f0005.Close();
    }
UPDATE
  • Create an instance of the table.
  • Call AddCriteria to specify your WHERE clause
  • Set the UpdateValue of all table columns
  • Call Delete
  • Close the table

Sample code:

   private void UpdateUdcCode()
    {
      GetAuditInfo auditinfo = new GetAuditInfo();
      if (auditinfo.Execute() != BusinessFunctionResult.Success) return;

      F0005 f0005 = new F0005();

      f0005.AddCriteria(Parenthesis.None, Conjunction.And, F0005.Column.ProductCode, SingleValueOperator.EqualTo,
        "59");
      f0005.AddCriteria(Parenthesis.None, Conjunction.And, F0005.Column.UserDefinedCodes, SingleValueOperator.EqualTo,
        "CC");
      f0005.AddCriteria(Parenthesis.None, Conjunction.And, F0005.Column.UserDefinedCode, SingleValueOperator.EqualTo,
        "01");

      // these values are hard coded here, but typically
      // they will come from the input document and/or a configuration file
      f0005.TcDescription001.UpdateValue = "Updated";
      f0005.TcDescription01002.UpdateValue = "Value";
      f0005.TcUserId.InsertValue = auditinfo.DpszUserName.OutValue;
      f0005.TcProgramId.InsertValue = "LYNX";
      f0005.TcDateUpdated.InsertValue = auditinfo.DpjdDate.OutValue;
      f0005.TcWorkStationId.InsertValue = auditinfo.DpszWorkstation_UserId.OutValue;
      f0005.TcTimeLastUpdated.InsertValue = auditinfo.DpmnTime.OutValue;

      f0005.Update();

      f0005.Close();
    }
DELETE
  • Create an instance of the table
  • Call AddCriteria to specify your WHERE clause
  • Call Delete
  • Close the table

Sample code:

   private void DeleteUDCCode()
    {
      F0005 f0005 = new F0005();

      f0005.AddCriteria(Parenthesis.None, Conjunction.And, F0005.Column.ProductCode, SingleValueOperator.EqualTo,
        "59");
      f0005.AddCriteria(Parenthesis.None, Conjunction.And, F0005.Column.UserDefinedCodes, SingleValueOperator.EqualTo,
        "CC");
      f0005.AddCriteria(Parenthesis.None, Conjunction.And, F0005.Column.UserDefinedCode, SingleValueOperator.EqualTo,
        "01");

      f0005.Delete();

      f0005.Close();
    }

Running Reports

To run/execute a report:

  • Create an instance of the report
  • Set the input parameters (optional)
  • Call Execute

Sample code:

    public void CallR0008P()
    {
      R0008P r0008p = new R0008P("XJDE0001");
      r0008p.DpcFiscalDatePattern.InValue = 'R';
      r0008p.Execute();
      
      // yes, this can retrieve errors from work center!
      Exception[] exceptions = r0008p.GetExceptions();
    }

Attaching Media Objects

LynX allows you to upload text/rft and file media objects. To attach a media object:

  • Retrieve an array of attachments from the DocumentContext object. Attachments are uploaded through the web service. All attachments have a key, which uniquely identifies which entity the attachment is associated with
  • Create an instance of the media object
  • Set the input parameter
  • Call UpdateAll

Sample code:

  public void AttachMediaObject()
    {
      // assumes that media objects were uploaded for this key through the web service
      MediaObjectAttachment[] attachments = DocumentContext.AttachmentSet.GetAttachmentsByKey("ADDRESS_BOOK");
      if (attachments.Length &amp;lt;= 0) return;

      ABGT abgt = new ABGT();
      // this is for address #500
      abgt.DpmnAddressNumber.InValue = 500;
      abgt.UpdateAll(attachments);
    }

Transaction Control

You can wrap the following operations in a JDE database transaction:

  • Business Function execute
  • Database operations (SELECT, INSERT, UPDATE DELETE)
  • Media object upload

To use transaction control:

  • Create a Transaction object
  • Call Begin to start the transaction
  • Pass the object in the constructor of the E1 object (business function, table, etc.)
  • Call Commit or RollBack based on the outcome of the work

Sample code:

  public void TransactionTest()
    {
      Transaction tran = new Transaction("my transaction");
      try
      {
        tran.Begin();
        
        // do something - call a bsfn, table i/o etc
        F0101 f0101 = new F0101(tran);
        
        // everything was successful, commit
        tran.Commit();
      }
      catch (Exception ex)
      {
        // something went wrong, rollbalk
        tran.Rollback();
        throw ex;
      }
    }

Conclusion

As you can see, LynX.Net is very powerful – you can create integrations in a familiar development environment without losing any E1 functionality. Please reply to this post if you have any questions.


Leave a comment >

Wouldn’t it be nice to write programs in C#/.Net to integrate external applications with E1? Harness your existing skill set or the (vast) existing pool of .Net resources? And do this using a familiar IDE – Visual Studio? Now you can, with Aellius LynX Business Integrator, an Oracle Validated product. LynX Business Integrator runs on top of EnterpriseOne’s application layer, so you are in compliance with EnterpriseOne’s security (i.e. no “back door” access).

EnterpriseOne Capabilities

Here’s what you can do with LynX Business Integrator:

  • Call Business Functions
  • Database Operations (Select, Insert, Update & Delete)
  • Upload and attach media objects
  • Transaction control (across the above three operations)
  • Call Reports

YouTube Demo

Architecture

Here is a simplified architecture diagram for LynX Business Integrator.

lbi architecture

  1. The external app creates an XML document and calls a web service.
  2. The web service passes the XML document to an integration server, which executes a LynX Business Process.
  3. The Business Process interacts with EntperiseOne internally through native C-API.

Business Process

The core of the integration is the Business Process. The Business Process consists of:

  • XML Schema to validate the XML document (submitted by the external app through the web service)
  • A .Net class written in C# (that implements a known interface)

XML Schema

The XML Schema accomplishes two things:

  • Provides a standard way to validate the document. So, you don’t have to write custom code, for example, to mandate that an address book number should be a numeric value with no fractions with a maximum length of 8.
  • Keep the same web service method for all integrations. For example, the external app can call the same web service method to upload Address Book records and query Address Book records. The difference between the two calls is in the XML document passed to the web service method.

Integration ID

The integration ID uniquely identifies a Business Process. The integration ID must be specified in the input document. This allows the system to identify the target XML Schema to validate the document.

Here is a sample document to find Address Book Records. The integration ID for this document is ERP.EOne.FindAddress.

<?xml version="1.0" encoding="utf-16"?>
<aelliusconnector>
  <processsettings
    aelliusrequestid="ERP.EOne.FindAddress"
    environment="JDV910" debug="false" />
  <document>
    <input>
      <MaxRecordCount>1000</MaxRecordCount>
      <AddressNumber>500</AddressNumber>
      <SearchType>C</SearchType>
    </input>
  </document>
</aelliusconnector>

Here is a sample document to find Fixed Asset Records. The integration ID for this document is ERP.EOne.FindFixedAsset.

<aelliusconnector>
  <processsettings
    aelliusrequestid="ERP.EOne.FindFixedAsset"
    environment="JDV910" debug="false" />
  <document>
    <input>
      <MaxRecordCount>1000</MaxRecordCount>
      <GetAllFields>false</GetAllFields>
      <UnitNumber>1010220</UnitNumber>
    </input>
  </document>
</aelliusconnector>

.Net Class Library

The .Net class library is created using a Visual Studio Template provided as part of the development toolset. This is just like any other .Net library. The .Net library must contain at least one class that implements the IIntegrationProcess interface. The LynX infrastructure calls a method (ProcessDocument) of the interface when a document is received by the web service. The meat of the integration is in this method:

  1. Retrieve the data from the XML document.
  2. Use LynX.Net API to access EnterpriseOne objects (see EnterpriseOne capabilities above)
  3. Create the output document. This document will be returned to the caller through the web service.

Note: There are no restrictions on what you can do in the .Net class. Everything that .Net has to offer is available to you.

The ProcessDocument method

This method is called by LynX to initiate the integration. A typical ProcessDocument method looks like this:


 public void ProcessDocument()
  {
    // deserialize the XML Document
    BusinessDocument doc = (BusinessDocument)DocumentContext.Deserialize(typeof(Demo1.BusinessDocument));
    DocumentContext.BusinessEntityObject = doc;
    try
    {
      // use E1 objects in your process

      // set the document's status to true to signal that
      // the request was successful
      DocumentContext.DocumentStatus = true;
    }
    catch (Exception excpt)
    {
      // add errors to the output
      DocumentContext.AddError(excpt, true);
    }
    finally
    {
      // serialize the typed class back to the XML document
      if (DocumentContext.BusinessEntityObject != null)
      {
        BusinessDocument bd = DocumentContext.BusinessEntityObject as BusinessDocument;
        DocumentContext.FinalizeOutput(bd.document.output, true, true);
      }
    }
  }
Retrieving data from the XML Document

You can use the XmlDocument object or deserialize the document to a typed object. The DocumentContext provides properties and methods to do this.

To access the XML document as an XmlDocument object:

      XmlDocument xml = DocumentContext.Document;
      string line1 = ((XmlText)xml.SelectSingleNode("/aelliusconnector/document/input/AddressLine1/text()")).Value;

To access the XML document as a typed object:

      BusinessDocument doc = (BusinessDocument)DocumentContext.Deserialize(typeof(Demo1.BusinessDocument));
      string addressline1 = doc.document.input.AddressBook.AddressLine1;
Using EnterpriseOne Objects in C#

So, how do we access E1 objects in C#? By generating typed classes that represent the underlying E1 object. dnetgen, a command line utility, creates typed classes for the specified E1 objects and compiles them into a library. That library is referenced in the business process library. The following screenshot shows how to generate a typed class for the F0005 object.

lbi architecture

Since F0005 is a typed class, it accurately represents the underlying E1 object. So, instead of using a generic class like this:

    TableObject tb = new TableObject("F0005");
    f0005.AddCriteria(Parenthesis.None, Conjunction.And, "ProductCode", SingleValueOperator.EqualTo, "00");
    string value = ((string)tb.GetSelectedValue("UserDefinedCode")).Trim();

you write:

    F0005 f0005 = new F0005();
    f0005.AddCriteria(Parenthesis.None, Conjunction.And, F0005.Column.ProductCode, SingleValueOperator.EqualTo,
      "00");
    string value = f0005.TcUserDefinedCode.SelectedValue.Trim();

The difference? Using the generic class is prone to errors. If you mistype the value F0005 in the constructor, a runtime exception will be thrown. The typed class catches these errors during compile time. Also note the implicit string conversion to get the selected value in the generic class. In the typed version f0005.TcUserDefinedCode.SelectedValue is typed to string data type.

Creating the Output Document

Before the ProcessDocument method exits, the document is finalized. This is done using one of the FinalizeDocument overloads of the Document Context method. Finalizing the document indicates that you are done with the request and that it is ready for the caller (of the web service) to receive.

          BusinessDocument bd = DocumentContext.BusinessEntityObject as BusinessDocument;
          DocumentContext.FinalizeOutput(bd.document.output, true, true);

In the next post, I will give you examples of C# code that illustrate the E1 capabilities of this product.